Let me say, we’ve all been there. Your boss hands you a stack of documents he wants scanned in to share with the rest of your team, but he wants them secure, so scan to email won’t do. Maybe you need to use those photos you took to create a presentation. You have the perfect machine to help you with the task too, because right there in the office is a nice Canon ImageRunner Advance, and scanning directly to your computer is faster and more secure.
It should be easy enough to do, right? Right!
Only, when you try, you find yourself standing there staring at the machine and asking, “Why aren’t you doing what I want you to???” It’s frustrating because you are a complete aficionado at the other functions of this machine, and this shouldn’t be this hard!
Making a Scan To Folder Step One: Breath!
First, I need you to take a deep breath, because help is on the way! I’m going to tell you exactly how to do this, and you’ll never struggle setting up a scan to file again!
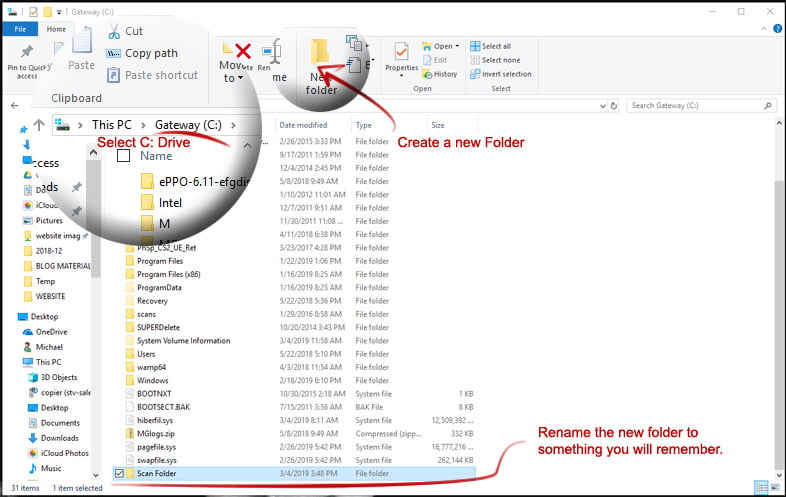
Next, you need to set up a file on your computer as a destination for your scans, and remember where you put it. There’s nothing worse than creating something on your computer, then forgetting where it is! To do this, open Windows Explorer (which you can find under your start menu, or by typing it into Cortana) and click on the C: drive. Once there, you will create a new folder and label it whatever you want. Pick a name that you will remember, because this is where the scanned documents will go! Before you move on, create a shortcut for the file by right-clicking on the folder and selecting Create Shortcut from the menu.
Making a Scan To Folder Step Two: Sharing is Caring
Now you’re going to change the share settings of this folder. The computer won’t know to share it with others in your network unless you tell it to, so you can’t skip the next few step. I know this is a bit tedious, but bear with me. Right-click over your new scan folder, and choose the “properties” option.
A box should pop up entitled “Folder Properties.” From here, you will select the sharing tab then click the “share” button, which will bring up “Network Access.” Go to the drop-down menu and choose “Everyone,” allowing access to those that you shared the new folder with. Don’t get too excited just yet! Before clicking “Share” at the bottom, you’ll want to change the permission level to “Read/Write”; otherwise coworkers will only be able to view the files, not interact with them.
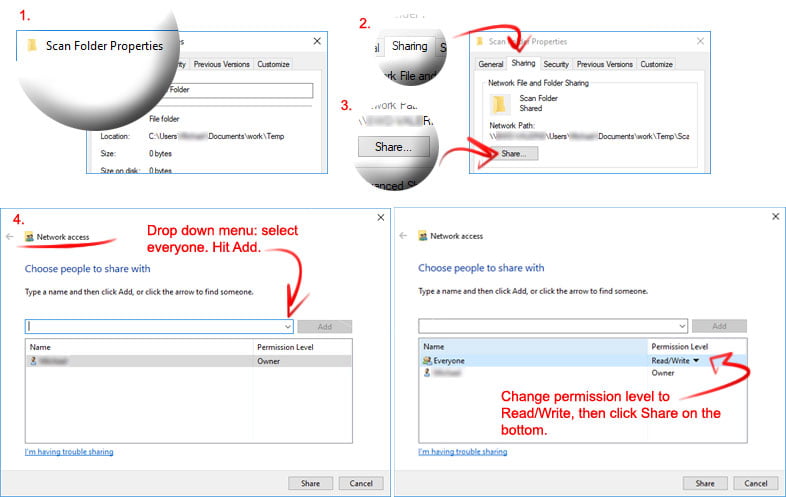
Now go ahead and click that share button!
We’re done, right? Not quite … Step 3
You should see a message that says, “Your folder is shared,” which is great—that’s what you want to see! Make sure you see the scan folder you created, as well as the computer name. This is super important—you’ll thank me later. Highlight and copy your computer name, and if you’re like me, also write it down on a post-it for good measure (You can find this on the Scan Folder Properties box under the Sharing tab. It is the first name in the Network Path) .
Go ahead and close out of the Network Access box now, and the Folder Properties box as well. We’re done with that part. Whew!
You’re almost ready! We’re moving down the home stretch!
Next, ensure the computer and the copier are on the same page, so to speak. Open a web browser and enter your copier’s IP address in the address bar (you can find this in your copier settings, click here for instructions). If you need to log in, do that now; otherwise, the screen will automatically continue to the next step.
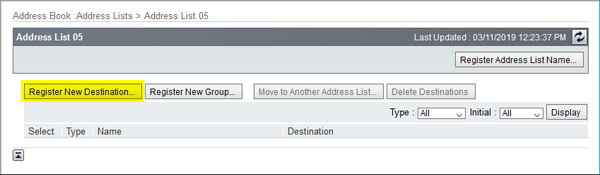
On the left side of the screen select the “Address Book,” then select an Address List (The first list is fine as each list will hold thousands of records).
Once you’ve picked your list, select “Register New Destination.”
Step 4: The Home Stretch
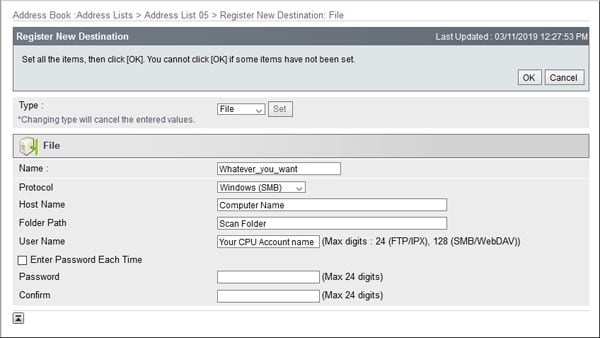
Starting under the “Type” field, choose “File” on the little drop-down menu and then hit “set.” Next, plug in your information under the “File” header. The name will be whatever you want your document file to be labeled. Remember the computer name I had you copy? I hope so. Enter that computer name into the “Host Name” field. Type in the name of the folder you made in the Folder Path field. Finally, enter the username for your computer. Hint: This is the one you use to log in to your actual computer.
Whew!!! That’s it! Now your computer and copier are talking to each other, and you can go to your copier and scan those bad boys in like the pro that you are! Aren’t you proud of yourself?
Article by Jessica Scroggin